Painting your walls can truly transform your space. A fresh coat of paint not only brightens a room but also enhances its overall appeal. Did you know that over 70% of homeowners feel happier in a freshly painted space? That’s a huge boost! Plus, painting a room yourself can save you money. Real estate studies show that a well-painted home can increase its value by up to 10%. With the right tools and techniques, you can paint your walls like a professional and enjoy the satisfaction of a job well done.
Key Takeaways
Gather essential tools like painter’s tape, drop cloths, and rollers to ensure a smooth painting process.
Clean your walls thoroughly before painting to improve paint adhesion and prevent peeling.
Use painter’s tape for crisp edges and remove it at the right time for the best results.
Apply paint using the ‘W’ technique for even coverage and to minimize lines.
Don’t skip priming; it enhances adhesion and reduces the number of paint coats needed.
Tools and Materials
Before you start painting, gather the right tools and materials. Having everything on hand will make your project smoother and more enjoyable.
Painting Supplies
Here’s a list of essential painting supplies that professional painters recommend:
Painter’s Tape: This helps you achieve crisp, clean lines.
Drop Cloths: Protect your floors and furniture from drips and spills.
Painter’s Tray: Use this for even loading of your roller.
Plastic Tray Liner: Simplifies cleanup and makes color changes easier.
Paint Brush: Essential for cutting in and painting trim.
Paint Roller Frame: Handles the bulk of the painting.
Roller Covers: Ensures a smooth application.
Extension Pole: Provides maximum reach with minimal effort.
These supplies will help you achieve a professional look in your room.
Safety Gear
Safety should always come first. Here are some important safety gear items to consider:
Use a properly fitted respirator (NIOSH approved) to protect against lead dust or fumes.
Ensure adequate ventilation when sanding or abrading paint; if not possible, wear an approved particulate respirator.
Taking these precautions will keep you safe while you work.
When it comes to paint, choosing the right type is crucial. Different finishes can affect the durability and appearance of your walls. For example, flat finishes hide imperfections well but are harder to clean. On the other hand, glossier finishes are more resilient and easier to maintain, making them suitable for high-traffic areas. Selecting the wrong sheen can lead to visible surface imperfections and inadequate durability, especially in areas that require frequent cleaning or are exposed to moisture.
By gathering the right tools and understanding the importance of paint selection, you’re setting yourself up for success in your painting project.
Prepare to Paint Your Walls
Before you dive into painting your walls, you need to prep the room properly. This step is crucial for achieving a professional finish. Let’s start with cleaning your walls.
Cleaning Walls
Cleaning your walls is essential for proper paint adhesion. If you skip this step, dirt and grease can create barriers that lead to peeling and flaking. Here’s how to clean your walls effectively:
Gather Your Supplies: You’ll need a mild detergent, warm water, microfiber cloths, and a sponge.
Dust First: Start with dry dusting to remove loose dust and cobwebs. You can use a microfiber cloth or a vacuum.
Wash the Walls:
Use a slightly wet sponge with warm water and a cleaning agent for general wall cleaning.
For larger areas, mist the walls with water and wipe with a damp cloth.
For stubborn stains, mix baking soda, TSP, or dish soap with vinegar for a DIY cleaning solution.
Rinse: After washing, rinse the walls with clear water to remove any soap residue.
Dry Thoroughly: Allow the walls to dry completely before you start painting.
Remember, improper wall cleaning can significantly impact paint adhesion and longevity. Contaminants can prevent proper bonding, leading to issues like peeling and premature paint failure.
Using Painter’s Tape
Now that your walls are clean, it’s time to use painter’s tape. This step helps you achieve crisp, clean lines, making your paint job look professional. Here’s how to apply painter’s tape effectively:
Technique | Description |
|---|---|
Press Down Firmly | Ensure a tight seal on all edges to prevent paint bleed. |
Seal the Tape | Apply a very light coat of paint to seal the tape, preventing paint bleeding. |
Burnish Thoroughly | Press the tape firmly into the texture using a putty knife or credit card. |
Don’t Stretch the Tape: Lay it down gently and press to seal. Stretching can cause lifting or curling.
Timing for Removal: Remove the tape when the paint is dry to the touch, usually about an hour after painting. If it feels gummy, leave it on overnight and remove it within 24 hours when it feels hard and dry.
Angle for Control: Pull the tape off at a 45-degree angle, keeping it low and close to the surface for better control.
By prepping your walls and using painter’s tape correctly, you set yourself up for a successful painting project.
Techniques to Paint Interior Walls
Now that you’ve prepped your walls, it’s time to dive into the actual painting techniques. Mastering these methods will help you achieve a professional finish that will impress anyone who steps into your room.
Cutting-In Technique
The cutting-in technique is essential for achieving neat edges around corners, ceilings, and trim. It involves using a brush to paint areas that a roller can’t reach. Here’s why this technique is so important:
It helps achieve neater corners.
You get a crisper and cleaner finish.
Outlining walls and ceilings before painting aids in blending paint seamlessly.
To perfect your cutting-in technique, practice is key. With time, you’ll become proficient at cutting in. Here are some tips to avoid common mistakes:
Speed Matters: Moving too slowly or too quickly can result in uneven lines.
Reload Your Brush: Keep your brush wet to avoid a dry application, which can lead to difficulties.
Aim for the Ceiling: When cutting in, paint slightly onto the ceiling rather than down from it. This creates a cleaner illusion of a straight line.
By mastering the cutting-in technique, you’ll set the stage for a flawless paint job.
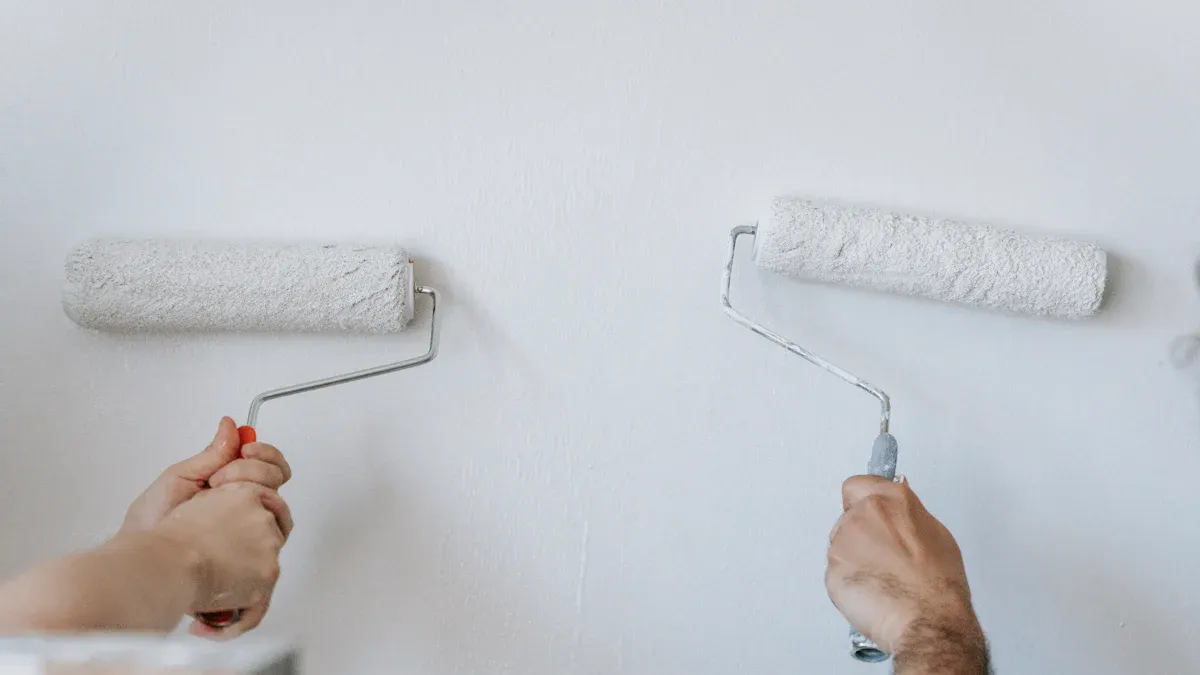
Roller Application
Once you’ve cut in the edges, it’s time to tackle the larger areas with a roller. The ‘W’ technique is a fantastic method for applying paint evenly and efficiently. Here’s how it works:
Cover Large Surfaces: The ‘W’ technique is effective for covering large areas quickly.
Minimize Lines: This method reduces the appearance of lines and stroke marks that can occur with vertical or horizontal application.
Even Distribution: It promotes a more even distribution of paint across the wall.
To use the ‘W’ technique, follow these steps:
Load your roller with paint and roll it onto the wall in a ‘W’ shape.
Fill in the gaps without lifting the roller, ensuring you cover the entire area.
Repeat this process, overlapping slightly with each stroke to maintain an even coat.
When choosing a roller, consider the texture of your walls. Here’s a quick guide to roller nap sizes based on wall texture:
Wall Texture Type | Recommended Nap Size |
|---|---|
Ultra-smooth surfaces | 3/16″ to 1/4″ nap |
Lightly textured walls | 3/8″ to 1/2″ nap |
Rough surfaces | 3/4″ to 1″ nap |
Very rough surfaces | 1 1/4″ to 1 1/2″ nap |
By using the right technique and tools, you can paint your walls like a professional. Remember, practice makes perfect, so don’t be discouraged if it takes a few tries to get it just right!
Achieving a Professional Finish
Priming and Coats
To achieve a professional-looking finish, you can’t skip the priming step. Priming prepares your walls for paint and offers several benefits:
It enhances paint adhesion, ensuring your fresh coat of paint sticks well.
It conceals stains that might bleed through the new paint.
It reduces the number of coats needed, saving you time and effort.
Here’s a quick overview of the benefits of using primer:
Benefit | Description |
|---|---|
Adds Durability | Improves the longevity of the paint job by preventing peeling, fading, and chipping. |
Helps Block Stains and Odor | Covers stains and odors, especially useful when painting lighter colors over stained surfaces. |
Assists with Color Changes | Prevents old colors from bleeding through, ensuring the new color appears as intended. |
Most interior walls typically require two coats of paint for optimal results. This ensures even color distribution and a smooth finish. If you’re making a significant color change, you might need an extra coat. Two coats create a durable film that can withstand cleaning and humidity, especially in high-use areas like kitchens and bathrooms.
Final Touches
After applying your coats, it’s time for the final touches. To smooth out imperfections, follow these steps:
Lightly sand the primer before applying the first coat using fine-grit sandpaper (320-grit).
Sand the first paint layer gently, applying even pressure.
Clean the surface with a damp tack cloth to remove dust before the next coat.
When it comes to removing painter’s tape, timing is key. Wait until the paint is dry to the touch, then score along the edge with a putty knife to prevent pulling up paint. Lift the tape back on itself at a 45-degree angle for the best results. If any adhesive sticks, try pulling at a 90-degree angle.
By following these easy steps, you can achieve professional results that will make your room shine. Remember, don’t skimp on prepping; it’s the foundation of a successful paint job!
You’ve learned how to paint your walls like a pro! Here’s a quick recap of the key steps:
Preparation: Clear the room, clean the walls, and fill any holes or cracks.
Choosing Your Paint: Select the right type and color for your space.
Application Techniques: Use painter’s tape for clean edges and apply paint in a ‘W’ pattern.
Drying and Second Coats: Let the first coat dry and check if a second coat is needed.
Finishing Up: Carefully remove painter’s tape and clean up.
Now, it’s time to roll up your sleeves and start your painting project! Remember, practice makes perfect. With patience and care, you can achieve a stunning, professional finish. 🎨✨
FAQ
What type of paint should I use for interior walls?
Choose a paint with a finish that suits your space. For high-traffic areas, consider satin or eggshell finishes. For low-traffic areas, flat finishes work well. Always test samples on your walls before committing.
How long should I wait between coats of paint?
Typically, you should wait 2 to 4 hours between coats. However, drying times can vary based on humidity and temperature. Always check the paint can for specific recommendations.
Can I paint over wallpaper?
It’s best to remove wallpaper before painting. If removal isn’t possible, ensure the wallpaper is clean and in good condition. Use a primer to help the paint adhere better.
How do I fix paint drips or runs?
Wait for the paint to dry completely, then lightly sand the area with fine-grit sandpaper. After sanding, wipe away dust and repaint the area for a smooth finish.
Is it necessary to use primer?
Yes, using primer is essential, especially on new drywall or when changing colors drastically. Primer improves paint adhesion and helps achieve a uniform finish.